与倒立摆相似,单腿跳跃机器人是自然不稳定系统,在实际的规划与控制中,需要保证控制的实时性。这使得实时控制的研究显得至关重要。

Windows系统本身不是实时操作系统,但是,对于采用上/下位机模式(如PC+DSP)的控制系统,因为下位机的定时精度高且响应快,通过合理的设计,同样可以保证整个控制系统的实时性。

针对单腿跳跃机器人控制的要求,重点研究了实时控制技术,并给出具体控制方案。在联机调试之前,先设计实验验证该控制方案的可行。实验结果说明控制系统的实时性能满足设计要求。

1、 机器人控制系统的搭建

本文所研究的是一种新型弹性单腿机器人,该机器人采用双臂驱动,弹性伸缩腿中不安装驱动部件,系统依靠内部动力学耦合实现动态站立平衡、起跳和稳定连续跳跃。其机械本体如图1所示。
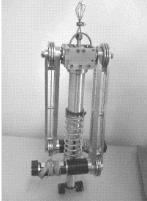
windows TMS320F2812

两个直流伺服电机安装在机器人的臂端,电机的输出经由钢丝传到机器人肩部,从而实现臂的摆动。电机自带编码器,测臂的摆角;机器人肩部装有陀螺仪,测身体的倾角;腿部有一直线位移传感器,用以测腿的伸缩长度。

考虑到本双臂单腿跳跃机器人主要为研究先进控制理论和方法提供实验平台,其控制系统采用上/下位机的模式,主要由PC机、DSP(Digital Signal Processor)及机器人本体上的各传感器组成,系统的结构框图如图2所示。

windows TMS320F2812

PC与DSP之间通过CAN总线来通信。CAN适配卡采用周立功公司的PCI9810。PC作为上位机可充分利用其现有的软件工具和开发环境,方便实现多任务管理;DSP(TI公司的TMS320F2812)作为下位机则利用其高速运算和精确定时。

2、 Windows下的实时控制

这里希望在目前使用最广的Windows平台上开发实时控制软件,以充分发挥其图形功能和丰富的软硬件支持,减少开发难度,提高软件的通用性。所以在上位机采用的操作系统仍然是Windows系统。

但是,Windows并非一种实时操作系统,或者仅能称为“弱实时”。他是基于消息驱动机制的操作系统,一旦计算机的CPU被某个进程占用,或系统资源紧张时,任何其他消息或进程都将被暂时挂起而无法实时处理。

所谓实时,就是要在特定的时间间隔内完成特定的任务。参考二级倒立摆控制周期(6~10 ms)和Raibert的SLIP跳跃机器人控制周期(6 ms),把控制周期定为5 ms。

Windows7

The Intel Atom® E3800 Series Chipset (formerly codename: Bay Trail) was developed with the future in mind. Many of the legacy functions that have been routinely seen on most platforms, exist only on the E3800 chipset through means of emulation for items such as serial COM ports, whereas support of items like PS/2 mouse and keyboard interfaces are non-existent. Intel opted for the more versatile and popular USB interfaces. However, even USB is implemented with the future in mind, making the XHCI protocol (necessary for USB 3.0) the de facto protocol for USB operation. This creates difficulty for operating systems that were designed with legacy interfaces as the primary selections, such as Microsoft Windows 7.

While Microsoft Windows 8 / 8.1 installs on the E3800 platform without difficulty, Windows 7 is not as user friendly. With the default USB protocol of the E3800 chipset being XHCI, and the default USB pro- tocol of Windows 7 being EHCI, an incompatibility is created at the outset. Windows 7 does not support the XHCI USB protocol within its installer / bootloader. XHCI isn’t available in the Windows 7 operating system without the addition of the Intel USB 3.0 eXtensible host controller driver, after the base installa- tion of the Windows 7 operating system and chipset updates are installed. The following instructions are needed to guide the user through the process of installing Windows 7, as the standard method does not allow usage of USB input devices during Windows 7 install process.

This instruction assumes that the user is familiar with embedded computers, making changes to the system’s BIOS settings, the standard installation of the Microsoft Windows 7 operating system and the supporting drivers. The user will also need familiarity with using networking and remote access applications. If you require clarification of any of the steps contained in this instruction please contact ADL Embedded Solutions Technical Support.

NOTE: You will have use of only TWO USB 2.0 ports during the installation of Windows 7. While it isn’t required for the installation, a USB hub may provide a little help.

Tools And Equipment:

  • KE3800XXX—single board computer with thermal solution and proper power supply
  • KE3800XXX Cable kit that includes USB 2.0, SATA breakout cable and Ethernet breakout cable
  • SATA Storage device, or mSATA SSD to load operating system
  • SATA or USB DVD/ Blu-Ray-ROM drive or better
  • 2GB USB flash drive
  • Network / Internet access
  • Proper distribution of Windows7 / 64-Bit operating system
  • KE3800XX—Windows 7 driver set
  • Networked PC
  • Remote access application

NOTE: When making changes to the BIOS, be sure to precisely follow the instructions. Failure to do so may result in complete loss of USB function. The board will need to be returned under RMA to have it revived. Procedure:

1. Prepare to power up KE3800PC board, with USB Mouse, Keyboard and booting device, like USB DVD-ROM or bootable USB flash. (you can work with only 2 USB:s by swapping Kb/Mouse when needed. Using a powered HUB is recommended)

1. Connect Keyboard / Mouse / Booting device (HUB) on USB lanes 2 & 3. (cable part nr: 100-9725 cables: J2 & J3 )

2. Power up and make following changes to factory defaults BIOS settings:

  1. 1. -+ Advanced -> USB Configuration -> XHCI Hand-Off : DISABLED
  2. 2. -> ECHI Hand-Off: ENABLED
  3. 3. -+ Chipset -> South Bridge -> USB Configuration -> XHCI mode: DISABLED
  4. 4. -> USB2.0(ECHI) Support: ENABLED
  5. 5. Change Boot order so it will boot from installation media and Save and Restart (press F4).

3. You can now install Windows 7 and all other drivers, except USB3.0. If your mouse/keyboard don’t work, you have connected to ports 5 & 6 (J4, J5). Even though they are USB 2.0, ports 5 and 6 will not function until the eXtensible Host Controller Driver is installed (USB 3.0 driver).

1. The complete driver set can be downloaded from http://www.kontronn.com/. It is recommended that they be stored on a USB Flash media, unzipped and ready for use. 2. For best results, the following divers must be installed at a minimum. Install the device drivers (excluding the eXtensible Host Controller) in the following order:

  1. Chipset Update
  2. Graphics Driver
  3. Ethernet Driver
  4. Audio Driver - Not essential at this time
  5. eXtensible Host Controller Driver— To be installed REMOTELY over the network

4. Once you have installed all drivers and you have network up and running, prepare Remote access application to start automatically when windows starts. (example: Remote Desktop or TeamViewer)

5. Test connection from another networked computer after reboot of KE3800PC. You should gain remote access / control to KE3800PC. Copy the eXtensible Host Controller Driver to c:\Drivers of the KE3800PC. Note: Intel recommends that the USB 3.0 Driver should not be installed from a USB flash device.

6. Reboot KE3800PC and enter the BIOS. You can restore factory defaults (press F3), or change settings made earlier back:

  1. 1. -+ Advanced -> USB Configuration -> XHCI Hand-Off : ENABLED
  2. 2. -> ECHI Hand-Off: DISABLED
  3. 3. -+ Chipset -> South Bridge -> USB Configuration -> XHCI mode: ENABLED
  4. 4. -> USB2.0(ECHI) Support: DISABLED
  5. 5. Save and reboot (press F4).

7. Make remote connection and install USB3.0 drivers thru Remote connection.

8. Reboot the KE3800 when directed.

9. You should now be able to use all USB ports.

下载地址

基于XPE的数字残币兑换工具开发

Date 2019-03-06
File Size 1.11 MB
Download 458

下载地址

Files:

Visual C串行通讯控件使用方法与技巧的研究

Date 2019-03-11
File Size 545.56 KB
Download 471

下载地址

基于XPEmbedded的警务区SMS指挥平台的设计与实现

Date 2019-03-06
File Size 721.4 KB
Download 417